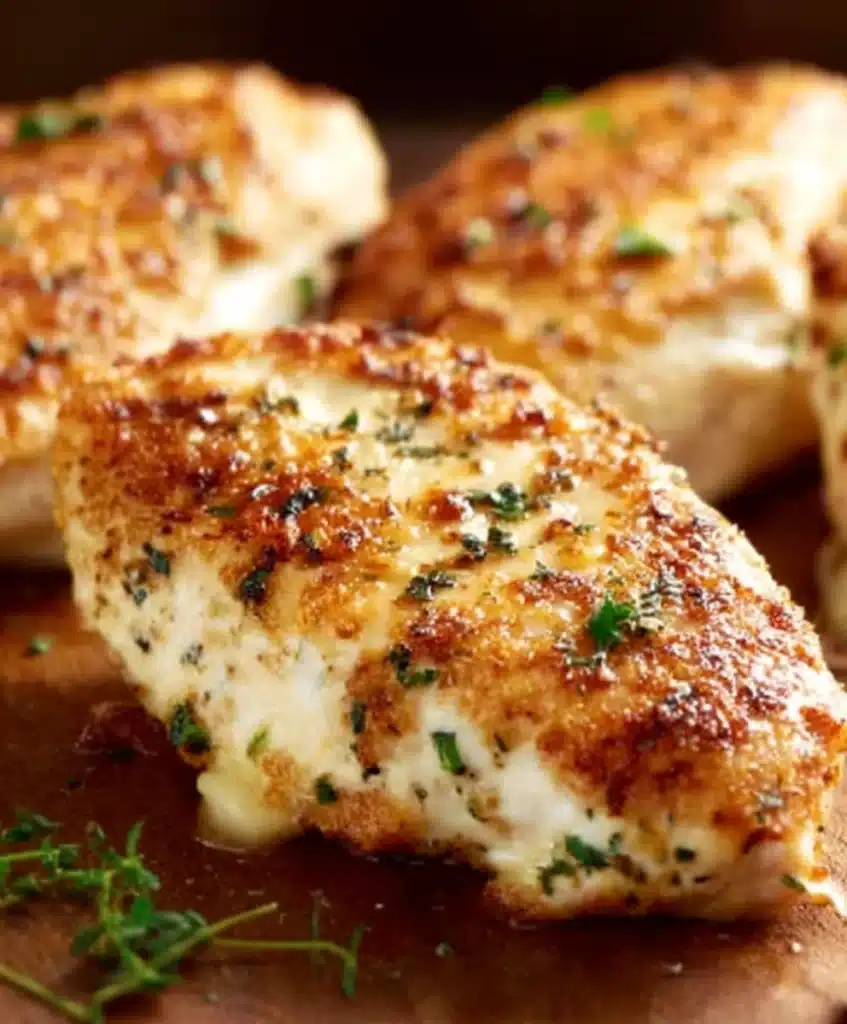
Melt In Your Mouth Chicken Breast is the ultimate weeknight savior and a guaranteed crowd-pleaser. There’s something inherently satisfying about a perfectly cooked chicken breast that’s so tender it practically dissolves on your tongue, leaving behind a burst of delicious flavor. Forget those dry, rubbery disappointments of the past! This recipe is designed to deliver consistently succulent results, transforming humble chicken breast into a culinary masterpiece. We all love chicken breast for its versatility and lean protein, but achieving that melt-in-your-mouth texture can feel like a culinary challenge. What makes this particular preparation so special is the simple yet effective technique that locks in moisture and infuses every bite with incredible taste, making it an instant favorite for busy families and dinner party guests alike.

Ingredients:
- 4 boneless, skinless chicken breasts
- 1 cup mayonnaise (or plain Greek yogurt for a lighter version)
- ½ cup grated Parmesan cheese
- 1 teaspoon garlic powder
- 1 teaspoon onion powder
- 1 teaspoon salt
- ½ teaspoon black pepper
- Optional: ½ teaspoon paprika or Italian seasoning (for topping)
Preparing for Melt-In-Your-Mouth Perfection
Preheating the Oven and Preparing the Chicken
The journey to incredibly tender and flavorful “Melt In Your Mouth Chicken Breast” begin extracts with setting up your cooking environment and getting the chicken ready. First things first, preheat your oven to a steady 400 degrees Fahrenheit (200 degrees Celsius). This consistent, medium-high heat is crucial for ensuring the chicken cooks through evenly without drying out. While the oven is warming up, take your four boneless, skinless chicken breasts and place them on a clean cutting board. It’s a good idea to gently pound them to an even thickness, about ¾ inch to 1 inch. You can achieve this by placing each breast between two pieces of plastic wrap or inside a large resealable bag and using a meat mallet, the bottom of a heavy pan, or even a rolling pin. Pounding the chicken to an even thickness is a secret weapon for achieving that “melt in your mouth” texture, as it ensures all parts of the chicken cook at the same rate. If you skip this step, the thinner parts might become dry before the thicker parts are fully cooked. Once they’re all uniformly thick, pat them dry with paper towels. This simple step helps the coating adhere better and promotes a nice, golden-brown crust.
Crafting the Creamy, Cheesy Coating
Mixing the Flavorful Coating
Now, let’s create the magical coating that will transform your chicken breasts into a truly delectable dish. In a medium-sized mixing bowl, combine the mayonnaise (or your chosen Greek yogurt for a lighter option) with the grated Parmesan cheese. If you’re using the optional Greek yogurt, it will provide a tangier flavor profile and a slightly lighter texture, but the mayonnaise offers unparalleled richness and moisture. Stir these two ingredients together until they are well incorporated and form a thick, creamy paste. Next, add the flavor boosters: garlic powder, onion powder, salt, and black pepper. These foundational spices are essential for building a robust flavor that permeates the entire chicken breast. Stir everything thoroughly until all the spices are evenly distributed throughout the mayonnaise and Parmesan mixture. Take a moment to taste a tiny bit of the mixture (ensure you don’t double-dip if you’re concerned about raw egg, though the heat of cooking will neutralize any concerns). Adjust seasoning if needed – perhaps a pinch more salt or pepper to suit your personal preference. This mixture should be thick enough to cling to the chicken without dripping off excessively. If it seems a little too stiff, you can add a tiny splash of milk or water, but usually, the mayonnaise provides enough moisture.
Coating and Baking for Ultimate Tenderness
Applying the Coating and Baking Instructions
With your oven preheated and your flavorful coating ready, it’s time to bring it all together. Take your prepared chicken breasts, one by one, and place them into the bowl with the mayonnaise and Parmesan mixture. Using a spoon or your hands (whichever you find easier), generously coat each chicken breast on all sides. Ensure a thick, even layer of the creamy mixture is spread across the entire surface. This coating acts as a barrier, trapping moisture inside the chicken as it bakes, which is key to achieving that “melt in your mouth” sensation. Once each chicken breast is thoroughly coated, carefully transfer them to a baking dish or a baking sheet lined with parchment paper. Parchment paper makes for incredibly easy cleanup, which is always a bonus! Arrange the chicken breasts so they aren’t touching each other; this allows for better air circulation around each piece, promoting even cooking and browning. If you are using any optional toppings like paprika for a touch of color and mild smoky flavor, or Italian seasoning for an herbaceous kick, sprinkle them evenly over the top of the coated chicken breasts now. This is your chance to add an extra layer of visual appeal and flavor complexity.
The Baking Process
Baking to Golden Perfection
Now, carefully place the baking dish or sheet into your preheated 400-degree Fahrenheit oven. The baking time will vary depending on the thickness of your chicken breasts, but generally, you’ll want to bake them for about 20 to 25 minutes. During this time, the magic happens. The mayonnaise and Parmesan will bubble and toast, creating a wonderfully golden-brown crust that is both creamy and slightly crisp. The heat will also penetrate the chicken, cooking it through and making it incredibly tender. To ensure your chicken is perfectly cooked and achieves that “melt in your mouth” quality, it’s essential to check for doneness. You can do this by inserting an instant-read thermometer into the thickest part of a chicken breast. It should register an internal temperature of 165 degrees Fahrenheit (74 degrees Celsius). Alternatively, you can pierce the thickest part with a knife; the juices should run clear, with no pink visible. Resist the urge to overcook! Overcooked chicken breast can quickly become dry and rubbery, so keep a close eye on it during the final minutes of baking.
Resting for Maximum Tenderness
The Crucial Resting Period
Once your “Melt In Your Mouth Chicken Breast” has reached the perfect internal temperature, remove the baking dish from the oven. This next step is often overlooked but is absolutely critical for achieving that signature melt-in-your-mouth texture. Let the chicken rest, uncovered, on the baking dish or a clean cutting board for at least 5 to 10 minutes before slicing or serving. This resting period allows the juices within the chicken to redistribute throughout the meat. When chicken is cooked, the muscle fibers tighten, squeezing out moisture. By letting it rest, you give those juices time to reabsorb into the meat, ensuring every bite is moist, succulent, and unbelievably tender. If you cut into the chicken immediately after removing it from the oven, all those delicious juices will simply run out onto the plate, leaving you with drier chicken. So, be patient! This short waiting period is the final secret to unlocking the ultimate tender and flavorful experience of your “Melt In Your Mouth Chicken Breast.”

Conclusion:
And there you have it! Your guide to creating the most tender and flavorful Melt In Your Mouth Chicken Breast is complete. We’ve explored the simple yet effective techniques of marinating and gentle cooking that transform ordinary chicken breast into an extraordinary dish. Remember, the key lies in patience and allowing the ingredients to work their magic. Don’t be afraid to experiment with the seasoning or the cooking method once you’ve mastered the basics. This versatile recipe is perfect for a quick weeknight dinner or an impressive meal for guests. Serve it alongside fluffy rice, a vibrant salad, or roasted vegetables for a complete and satisfying experience. We encourage you to try this recipe and discover for yourself just how delicious and easy it can be to achieve perfectly cooked chicken every single time!
Frequently Asked Questions:
What is the best way to ensure my chicken breast doesn’t dry out?
The primary method we’ve emphasized is the marinade, which infuses moisture and flavor. Additionally, avoid overcooking. Using a meat thermometer to check for an internal temperature of 165°F (74°C) is crucial. Letting the chicken rest for 5-10 minutes after cooking also allows the juices to redistribute, keeping it moist.
Can I make the marinade ahead of time?
Absolutely! In fact, making the marinade ahead of time is highly recommended. You can prepare the marinade up to 24 hours in advance and store it in an airtight container in the refrigerator. This allows the flavors to meld together beautifully, resulting in an even more delicious Melt In Your Mouth Chicken Breast.
Melt In Your Mouth Chicken Breast – So Tender
An incredibly tender and flavorful chicken breast recipe coated in a creamy, cheesy mixture and baked to perfection.
Ingredients
-
4 boneless, skinless chicken breasts
-
1 cup mayonnaise
-
½ cup grated Parmesan cheese
-
1 teaspoon garlic powder
-
1 teaspoon onion powder
-
1 teaspoon salt
-
½ teaspoon black pepper
-
Optional: ½ teaspoon paprika or Italian seasoning
Instructions
-
Step 1
Preheat your oven to 400°F (200°C). Gently pound chicken breasts to an even thickness of ¾ to 1 inch and pat dry. -
Step 2
In a bowl, combine mayonnaise (or Greek yogurt), grated Parmesan cheese, garlic powder, onion powder, salt, and black pepper. Mix until well combined and creamy. -
Step 3
Generously coat each chicken breast on all sides with the mayonnaise and Parmesan mixture. Ensure a thick, even layer. -
Step 4
Place coated chicken breasts in a baking dish or on a parchment-lined baking sheet, ensuring they do not touch. Sprinkle with optional paprika or Italian seasoning if desired. -
Step 5
Bake for 20-25 minutes, or until the internal temperature reaches 165°F (74°C) and juices run clear. -
Step 6
Let the chicken rest uncovered for 5-10 minutes before slicing and serving to ensure maximum tenderness.
Important Information
Nutrition Facts (Per Serving)
It is important to consider this information as approximate and not to use it as definitive health advice.
Allergy Information
Please check ingredients for potential allergens and consult a health professional if in doubt.